
Types of Appliances
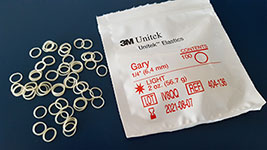
Elastics (Rubber Bands)
Wearing elastics (or rubber bands) improves the fit of your upper and lower teeth. Wear rubber bands as instructed, and remember that the rubber bands work far more efficiently if they're worn as prescribed.
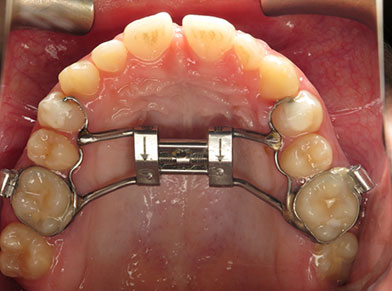
Forsus™
The Forsus Fatigue Resistant Device is an alternative to headgear which promotes growth in adolescents, helping to eliminate excessive overbites, improve the fit of teeth, and possibly prevent the need for jaw surgery.
Herbst® Appliance
The Herbst® appliance reduces overbite by encouraging the lower jaw forward and the upper molars backward. This fixed appliance is used mostly for younger, growing children and is worn for about 12-15 months.
Retainers
Retainers may be removable or fixed. They hold your teeth in their new, correct positions after your teeth have been straightened. Our practice will instruct you on how to care for your retainer and about the duration of the wear. Wearing your retainer as directed is crucial to prevent regression of your treatment.
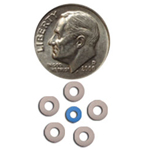
Separators or Spacers
Separators are little rubber doughnuts that may be placed between your teeth to push them apart so that orthodontic bands may be placed during your next appointment. The separators will be removed before we place the bands. Separators do not mix well with sticky foods, toothpicks, or floss.
Bite Turbos
Bite turbos are platforms of dental bonding resin added to the biting surfaces of selected posterior (and sometimes anterior) teeth that allow the vertical overbite to improve more rapidly. There is evidence that bite turbos may also speed the alignment of teeth by preventing the “interfering” forces caused by the patient’s natural bite. Bite turbos also help prevent breakage of brackets bonded to lower teeth. However, bite turbos also temporarily affect a patient’s ability to chew. There may be an increased risk of choking while eating for patients who have bite turbos. Here are some things to consider and to do to reduce the risk of choking during meals and snacks.
- For the first week following the placement of the bite turbos, all food should be soft and easily swallowed. This would include foods such as yogurt, cottage cheese, applesauce, soup, mashed potatoes, pasta, etc. This will give the patient some time to relearn how to chew with the turbos in place with very minimal risk of choking.
- For the first two weeks after bite turbos are placed, avoid whole meats such as pork chops, whole chicken (such as chicken strips, chicken breast, etc.), steak, whole sausage, and hot dogs. These meats can be modified to be made safer by chopping, grinding (such as ground beef), shredding or cutting into very small, swallowable bits.
- Fresh, raw vegetables such as carrots, cauliflower, broccoli, celery, lettuce, cabbage, and virtually all other varieties of fresh, raw vegetables can pose a risk. Vegetables should be softened by cooking and/or cutting into very small, swallowable pieces such as is often found in salsa or soup. Bread can also be a risky food during the first two weeks.
- For the first week following the placement of the bite turbos, patients with bite turbos should not eat alone. All patients should eat with someone who is capable of recognizing a problem such as choking and is capable of helping the patient with the problem such as a call for help or providing first aid. It is recommended that all teens and adults learn basic life saving techniques including CPR and First Aid for Choking Victims.
- If a patient is choking and there is no one present to provide First Aid for Choking Victims, call 911 immediately.
Choking on food with bite turbos is a very rare event. This section is provided to help you to be aware of the risks and how to reduce the risk. Please direct any questions regarding your bite turbos to any a member of our clinical staff.
Protraction Face Mask
Your protraction face mask is an important part of the improvement of your smile and bite. It is critical that you use your face mask as directed so that you can enjoy the good results and avoid extended time in braces. Here are some things you should know about your face mask.
- The face mask is adjusted for a custom fit. DO NOT adjust your face mask at home. If the fit changes or becomes uncomfortable, call the office soon.
- Use only the elastics (rubber bands) given to you in our office. DO NOT use “household” rubber bands and elastics used for hairstyling.
- It will take some time to become accustomed to your face mask. Be patient. Over-the-counter pain remedies such as acetominophen (Tylenol) and ibuprophen (Motrin, Advil) are helpful. Use as directed on the label and do not use for more than 8 days in a row.
- Some patients will notice an acne-like rash on the areas of the face in contact with the face mask. Zinc oxide ointments or creams (e.g. Desitin) are helpful. Use as directed on the label.
- If you are unable to use the face mask for any reason, notify us.
Thank you for your cooperation! If excellent results are desired, excellent cooperation is required!
Temporary Orthodontic Anchorage Devices (TADs)
WHAT YOU NEED TO KNOW…
Temporary orthodontic Anchorage Devices (TADs) are used to provide a stable anchor in order to more predictably move teeth during orthodontic treatment.
Some benefits of TADs:
- May reduce overall treatment time
- More predictable results
- In some cases, the use of TADs may reduce the need for jaw surgery
How TADs are placed
- Under local anesthesia by a doctor
- No needles are required for the placement of most TADs
- The procedure usually takes about 5-10 minutes per TAD
Some things you need to know…
- TADs have a failure rate of 5-15% depending on where the TAD is placed
- Failure means the TAD comes loose or falls out
- If your TAD is loose, please call the office at the number below
- TADs are made of a titanium alloy
- No reports of allergy have been documented
- If you have a metal allergy diagnosed by a physician, please tell one of the doctors
- TADs are left in place until treatment is completed
- Normally 6-18 months
- TADs are removed under local anesthesia by one of the doctors
- Occasionally the TAD may contact the root of a tooth during placement
- This can cause some discomfort
- This has not been shown to have any long-term effect on the health of the tooth involved
- The roots of teeth are susceptible to resorption (shortening) in some cases
- Normally 6-18 months
- Patients on osteoporosis medication (bisphosphonates such as Boniva, Actonel, Fosamax, etc.) may experience a rare side effect that could result in permanent damage to the jaw. Please tell the doctor if you are using any of these or related medications.
- Post-operative infections are rare but may occur. Antibiotics are not typically needed.
- Numbness or tingling of the lips, cheeks, or tongue are possible, but have not been reported.
How to care for your TADs
- Brush your teeth as you normally would
- Brush around the TAD gently, with light pressure, using a circular motion
- Brush the TAD at least twice a day
- Do not wrap floss around your TAD
- You may use a WaterPik (Do not allow the the tip to get closer than 1.5 inches from the TAD)
- Do NOT try to remove the TAD. Do not allow anyone other than a licensed dentist to remove or adjust the TAD.
- You may use mouthwash. Our practice recommends Crest Pro-Health for daily users.
It is normal to feel some pressure after the TAD is placed. This will go away after the first few days. If you have any soreness in the gums or nearby teeth 3 days or more after placement of your TAD, please call our office at the number below.
What to do if you have a concern or question… Please call the office (915) 581-8152
If you have an after-hours emergency, call (915) 920-3961
Tongue Reminders
Purpose: Tongue reminders are placed behind the lower front teeth, to act as an unconscious reminder to the tongue. These tongue reminders aid in retraining tongue posture (the tongue should rest on the roof of the mouth, and not position forward through or over the lower front teeth).
General Information: Once tongue reminders have been placed it will take several days to get used to them. Please know there will be quite a bit of discomfort the first two days – and this is quite normal. Tylenol, Aspirin, etc. can be taken for the discomfort. Wax can be used only for the first 2-3 days.
Tongue reminders will remain in the mouth through the duration of treatment time.
Wax Packs
The purpose of this wax is to keep the patient as comfortable as possible during orthodontic treatment, if they have something sticking or rubbing them.
You will need to use wax if:
- A wire is poking.
- A bracket is rubbing against lips or cheeks.
The way you use the wax is as follows:
- Dry the area very thoroughly with a kleenex or towel.
- Pinch a little off, forming a ball of wax with your fingers.
- When the wax is in a ball, apply it where the problem is. Make sure you put the wax around the object to hug the wire, bracket, etc. The wax will come off with a cold drink or when you brush your teeth.
If you have a problem that continues to bother you, please call us for a V.I.P. appointment so we can assist you.
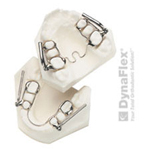
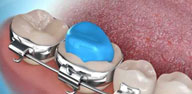
Your Quad Helix Expander
- Your Quad Helix Expander is custom fit to widen your smile
- You may feel some pressure for 2-7 days after the Doctor has inserted or activated your expander
- You may find it difficult to speak for a few days. Don’t worry, most patients are speaking normally after a few days.
- You will have to get used to eating with your expander. Most patients need about a week.
- Clean your expander with a toothbrush and a WaterPik.
- Use mouthwash. I recommend Crest ProHealth.
- If something feels wrong or the expander feels loose, please call the office.
- This type of expansion appliance is usually in place for about 6 months.
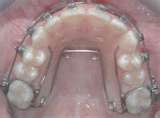
Rapid Palatal Expander or RPE
RPE is used quite frequently in orthodontic treatment to create space in the upper jaw for permanent teeth to come in, change the growth pattern of the jaw and eliminate a posterior crossbite. Essentially, an RPE widens the upper jaw of a person’s mouth.
The upper jaw is actually created from two separate halves of bone, separated by what is called a suture. An RPE separates the two halves of the upper jaw and widens the distance between those halves over time to create additional space for permanent teeth to come in.
Most RPEs are placed in the roof of the patient’s mouth via metal bands that surround the teeth. The RPE has an expansion screw mechanism that must be turned with a key once a day. It helps to widen the upper jaw over time until the desired space is created.
How do you turn or activate Rapid Palatal Expander or RPE?
It is difficult to turn; an adult should do this.
When we place the RPE, we will provide a wire or key that fits into a small hole in the expander.
Here are the steps we recommend to turn or activate the RPE:
- Lie down on a bed or couch where there is good light. Then, tilt the patient’s head back so the RPE can be clearly seen.
- Place the wire key into the front hole of the RPE and rotate it to the back of the mouth until it stops.
- Pull the key out towards the back of the mouth.
Now you should be able to see a new hole in the front of the expansion screw for your next turn. (Note: If you do not rotate the key all the way to the back of the mouth, the new hole in the front may be partially blocked and the key will not go in next time. If that is the case, you need to find the hole in the back of the mouth and complete the turn.)
This process includes one turn, front to back. Usually Dr. Gaynier recommends that a patient turn the RPE once a day for a certain number of weeks (Be sure to follow the instructions from Dr. Gaynier regarding how often to turn the RPE). Then, you stop turning the expander and Dr. Gaynier checks the width to see if additional turns may be necessary.
If you have additional questions on how to turn or activate the RPE, please contact our office.
If I miss a turn of the RPE, what should I do?
You can make up the missed turn the following day, usually once in the morning and once in the evening for a total of two turns that particular day. If you miss your appointment in the office, do not continue to turn the RPE.
Does a Rapid Palatal Expander (RPE) hurt?
No, a rapid palatal expander is not painful. After the RPE is turned or activated, the patient will feel pressure for about 5 minutes or so and then it disappears. The pressure is similar to taking your thumb and pressing against your teeth.
Is it normal to get a space between your front teeth if you are wearing an RPE?
Yes. The space between the front teeth means the RPE is working and the palatal bones are separating properly. The teeth will start to spontaneously drift back together when the turns are stopped. Any remaining space will be closed with braces.
Dr. Gaynier will tell you when you have turned the RPE enough and he will leave it in place for about three months. The suture or area that separates the two pieces of bone in the upper jaw will close with new bone formation and become stable. Some of the width gained can be lost if the RPE is removed too early.